Sunday, February 11, 2007
Monday, February 05, 2007
A hat for Siamese twins?
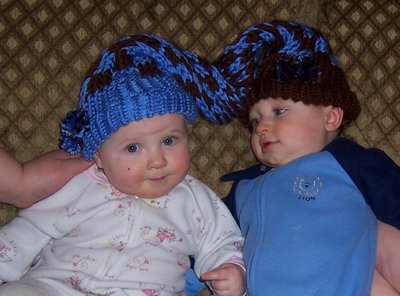
Graci and George model their crazy Aunt Kristi's latest creation...
Is it really?
 Nah...as Graci shows us it's just a funny, extra long hat.
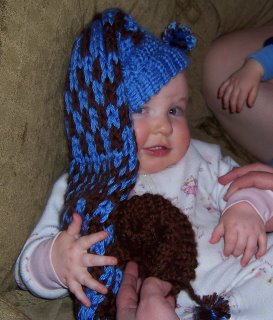
 And George shows us it's reversible!!!
The pompons that seem like mere decoration are actually cleverly disguising drawstrings to close the end opposite of the one you wish to wear.
Directions, after a fashion...
First, I'm just assuming you know how to color work already, also how to follow a chart. I'm not the best person for explaining this sort of thing and instructions are readily available at sites such as Purling Sprite and Decor Accents. Knowing how to make a pompon is useful but tassels or cute buttons would work as well.
Materials
1 skein color A (I used Caron's Simply Soft Berry Blue)
1 skein color B (I used Caron's Simply Soft Chocolate)
Knifty Kniitter Loom of your choice (Example was made on the red one)
Crochet Hook
Yarn Needle
Instructions
With 2 strands of color A held together as one, cast on the loom and knit for 14 rows. Pull up bottom row to make a brim. Continue knitting with color A for 9 rows.
Begin Chart
 Fairly straight forward, the chart is designed to fade from Color A to Color B. You don't really have to make your hat this ridiculously long. You can choose any pattern that gets heavy on the secondary color as you go. (Progressively wider stripes of Color B or Half Color A, Half Color B. Maybe Using Color A as one brim, Color B as the second brim and using a strand of each as the middle...anyway you get the idea)
Once you've worked The Chart Continue knitting with Color B for nine rows.
The Tricky Bit
You need to mark this next row to make it easier to find. I took a long piece of Color A yarn And held it in the front between the wraps on each peg, then knit over it to trap it in place. It was secure but still easy to pull out when I didn't need it anymore. This is marked row is row 1. You'll need to knit 13 more rows.
Following down from any peg, reach inside the tube and pull up one loop from the marked row. Place the loop on the corresponding peg. (If you accidentally pick up the marker yarn, slip it off the peg.) Continue picking up loops from the inside and placing them on the pegs until every peg has a loop. Knit the loops. Bind off hat in the manner you prefer most. (I used the crochet method because I wanted to see if I could do it.) Remove the marker yarn.
Finishing
Make 4 small pompons (I used 2 strands of A and one strand of B for the A side and switched it for the B side)
or tassels or buttons or whatever.
Chain stitch a length of (A for A, B for B) yarn that is equal to the length of the hat at it's most stretched. Attach a pompon to one end and thread the other end through the stitches right above the brim. Tie the other end to the other pompon.
Repeat for the other side.

Graci and George model their crazy Aunt Kristi's latest creation...
Is it really?
 Nah...as Graci shows us it's just a funny, extra long hat.
 And George shows us it's reversible!!!
The pompons that seem like mere decoration are actually cleverly disguising drawstrings to close the end opposite of the one you wish to wear.
Directions, after a fashion...
First, I'm just assuming you know how to color work already, also how to follow a chart. I'm not the best person for explaining this sort of thing and instructions are readily available at sites such as Purling Sprite and Decor Accents. Knowing how to make a pompon is useful but tassels or cute buttons would work as well.
Materials
1 skein color A (I used Caron's Simply Soft Berry Blue)
1 skein color B (I used Caron's Simply Soft Chocolate)
Knifty Kniitter Loom of your choice (Example was made on the red one)
Crochet Hook
Yarn Needle
Instructions
With 2 strands of color A held together as one, cast on the loom and knit for 14 rows. Pull up bottom row to make a brim. Continue knitting with color A for 9 rows.
Begin Chart
 Fairly straight forward, the chart is designed to fade from Color A to Color B. You don't really have to make your hat this ridiculously long. You can choose any pattern that gets heavy on the secondary color as you go. (Progressively wider stripes of Color B or Half Color A, Half Color B. Maybe Using Color A as one brim, Color B as the second brim and using a strand of each as the middle...anyway you get the idea)
Once you've worked The Chart Continue knitting with Color B for nine rows.
The Tricky Bit
You need to mark this next row to make it easier to find. I took a long piece of Color A yarn And held it in the front between the wraps on each peg, then knit over it to trap it in place. It was secure but still easy to pull out when I didn't need it anymore. This is marked row is row 1. You'll need to knit 13 more rows.
Following down from any peg, reach inside the tube and pull up one loop from the marked row. Place the loop on the corresponding peg. (If you accidentally pick up the marker yarn, slip it off the peg.) Continue picking up loops from the inside and placing them on the pegs until every peg has a loop. Knit the loops. Bind off hat in the manner you prefer most. (I used the crochet method because I wanted to see if I could do it.) Remove the marker yarn.
Finishing
Make 4 small pompons (I used 2 strands of A and one strand of B for the A side and switched it for the B side)
or tassels or buttons or whatever.
Chain stitch a length of (A for A, B for B) yarn that is equal to the length of the hat at it's most stretched. Attach a pompon to one end and thread the other end through the stitches right above the brim. Tie the other end to the other pompon.
Repeat for the other side.


